If you’re the proud owner of a 2006 Toyota Corolla, you know how important it is to keep your ride running smoothly. One critical component that can sometimes fail is the fuel pump. A malfunctioning fuel pump can lead to poor performance, stalling, or even prevent your car from starting. But don’t worry! Replacing the fuel pump isn’t just for mechanics—it’s a project you can tackle yourself with some essential tools and determination. In this comprehensive DIY guide, we’ll walk you through every step needed to replace the 2006 Corolla Fuel Pump in your trusty Corolla. Whether you’re an experienced gearhead or a weekend warrior looking to learn something new, this guide will help you navigate each stage safely and effectively.
Tools and Materials Needed
Before you roll up your sleeves, gather all the necessary tools and materials for replacing the fuel pump in your 2006 Toyota Corolla. Having everything on hand will streamline the process and reduce frustration.
You’ll need essential hand tools like a socket set, wrenches, and screwdrivers. A ratchet with various sockets removes bolts that secure the fuel tank and pump assembly. Don’t forget pliers; they can help with clamps or stubborn fasteners.
Safety equipment is essential, too. Wear gloves to protect your hands from dirt and chemicals and safety goggles to shield your eyes while working under the vehicle. Consider having a fire extinguisher nearby since you’ll be dealing with flammable fuel.
Ensure you have new replacement parts—specifically, a compatible fuel pump for your model year. Check if you need new seals or gaskets to ensure everything fits snugly once installed. With these tools and materials gathered, you’re one step closer to tackling this project confidently!
Safety Precautions: 2006 Toyota Corolla Fuel Pump
Safety should always come first when working on your vehicle. Before you begin replacing the 2006 Toyota Corolla Fuel Pump take a moment to prepare for a safe work environment. Ensure that you are wearing appropriate personal protective equipment, such as gloves and safety goggles.
Work in a well-ventilated area. Gasoline fumes can be hazardous, so avoid enclosed spaces. If possible, do this repair outdoors or in a garage with doors open for airflow.
Also, look for potential fire hazards around your workspace. Avoid using tools that create sparks near gasoline or other flammable materials. It might be wise to have a fire extinguisher nearby in emergencies.
Disconnect the battery before starting any work on the fuel system. This will help prevent accidental electrical shorts while handling sensitive components like wiring and connectors. Taking these precautions helps ensure your safety and protects your vehicle during maintenance.
Preparing Your Vehicle
Before replacing your fuel pump, it’s essential to prepare your vehicle properly. Start by parking on a flat surface. This ensures safety and prevents any unexpected movement while you work. The level ground also makes it easier to manage tools and materials.
Next, gather all necessary tools and materials close at hand. Organising everything, whether wrenches, screwdrivers, or a new fuel pump, will save time. You don’t want to scramble for parts when you’re in the middle of removing components.
Once you’ve set up your space, disconnect the negative battery terminal. This step is crucial to prevent electrical mishaps while working on the fuel system. Always prioritize safety over speed; this precaution can save you from potential shocks or sparks.
Ensure you have access to plenty of light under your vehicle’s hood and around the tank area where you’ll work. Good visibility helps prevent mistakes and lets you see what you’re doing clearly throughout each replacement process step.
Draining the 2006 Toyota Corolla Fuel Pump Replacement
Draining the 2006 Toyota Corolla Fuel Pump Replacement is crucial before replacing the fuel pump in your 2006 Corolla. Start by ensuring you have a suitable container to collect the old fuel; proper disposal is essential for safety and environmental reasons.
Locate the drain plug on your fuel tank; it’s typically found at its lowest point. If your model doesn’t feature one, you might need to siphon the gas through the filler neck using a hand pump or siphoning hose. Always wear gloves and goggles during this process.
Before starting, ensure you work in a well-ventilated area away from open flames or sparks. Gasoline vapours can be hazardous, so taking precautions is key to staying safe while draining your tank.
Once you’ve removed most of the fuel, use an absorbent cloth to wipe any spills around the opening. This helps keep things tidy and reduces fire hazards when you proceed with removing components necessary for accessing your new fuel pump installation.
Removing the Old Fuel Pump
Now that you’ve drained the fuel tank, it’s time to tackle the old fuel pump. Start by locating the access panel in your trunk. This is typically beneath a carpet or cover near the rear seat. Remove any screws or fasteners to expose the fuel pump assembly.
Before you proceed, make sure all electrical connections are unplugged. Carefully detach any hoses connected to the pump as well. Fuel may still be present in these lines, so have a rag handy to catch spills and prevent messes.
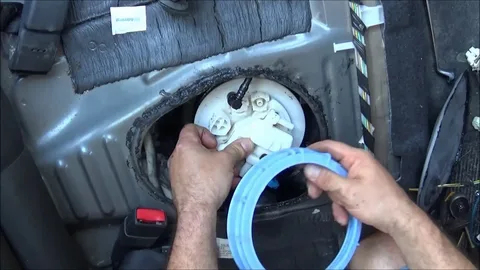
Next, loosen the retaining ring that holds the fuel pump in place. A unique tool can help with this step, but a flathead screwdriver often does the job if you don’t have one. Turn it counterclockwise until it’s free from its mount.
Once loose, gently lift the old fuel pump assembly from its housing. Take care not to damage any surrounding components during this process. Inspect everything closely; this is also an excellent opportunity to clean and check other parts of your vehicle’s fueling system before installing new hardware.
Installing the New 06 Corolla Fuel Pump
Once the new 06 Corolla Fuel Pump is ready, it’s time to install it. Start by carefully positioning the new pump into the fuel tank. Ensure that alignment tabs or guides match up properly with their designated slots. This step is crucial; misalignment can lead to issues later on.
Next, secure the pump using the original hardware if it’s still in good condition. If not, replace it with new bolts as needed. Tighten each bolt evenly—this will help prevent leaks and ensure a snug fit without causing damage.
Before fully sealing everything back up, reconnect any hoses and electrical connections detached during disassembly. Ensure these are securely fastened, as loose fittings can cause operational problems later.
After securing everything, double-check your work one last time before reassembling other vehicle components. Taking this extra moment for inspection could save you from potential headaches once you’re ready to start your engine again!
Reconnecting Electrical Connections and Bolts
Once the new fuel pump is securely in place, it’s time to reconnect the electrical connections. Start by aligning the connectors properly with their respective slots. Ensure you push them firmly together until you hear a click. This sound signifies that they are locked into position and ready for operation.
Securing Bolts Around the Fuel Pump Assembly
Now, turn your attention to securing all bolts around the fuel pump assembly. Use a torque wrench to tighten each bolt according to the manufacturer’s specifications in your service manual. Properly tightened bolts prevent leaks and ensure a stable installation.
Performing a Thorough Inspection
Before moving on, double-check everything you’ve connected so far. A thorough inspection can catch minor issues before they escalate into major problems later, ensuring peace of mind when you start up your vehicle again after this DIY project.
Testing and Final Adjustments: Fuel Pump 2006 Toyota Corolla
Once you have installed the new Fuel Pump 2006 Toyota Corolla, it’s time for testing. Start by reconnecting the battery terminal securely. This will power up the electrical system and allow you to check if everything functions as it should.
Next, turn on the ignition without starting the engine. You should hear a faint humming sound from the fuel pump, indicating that it’s priming. If nothing happens, double-check all connections made during installation.
After confirming that the pump is getting power, attempt to start your vehicle. After being idle, it may take a few seconds for fuel to reach the engine, so be patient. Once started, listen for any unusual noises or irregularities in performance.
Observe for any leaks around where you connected your new pump. A proper seal is crucial to avoid future fuel leakage issues. Allow your car to run for a few minutes while checking gauge readings and ensuring adequate pressure levels are maintained throughout this process.
Conclusion
Replacing the 2006 Corolla Fuel Pump can seem daunting, but with the right tools and preparation, it becomes manageable. This DIY project saves you money and gives you valuable experience working on your vehicle. Remember that safety is paramount throughout the process. Taking proper precautions helps ensure your well-being and your car’s integrity. Always work in a well-ventilated area when handling fuel. After completing each step, you can take pride in knowing you’ve enhanced your vehicle’s performance by installing a new fuel pump. A fresh pump means improved efficiency and reliability for countless journeys ahead.
FAQs
How do I know if my 2006 Corolla Fuel Pump is failing?
Common symptoms of a failing fuel pump include difficulty starting your car, engine sputtering during acceleration, or an unexpected drop in power. If you notice these issues, it might be time to inspect or replace your 2006 Corolla Fuel Pump.
Can I replace the fuel pump myself?
Absolutely! If you have basic mechanical skills and follow safety precautions properly, replacing the fuel pump is well within reach for DIY enthusiasts. Just make sure you have all the necessary tools on hand before beginning.
What should I do if my new fuel pump isn’t working?
If you’ve installed a new fuel pump but it’s not functioning correctly, double-check all electrical connections and ensure no leaks. It also helps to check fuses related to the fuel system.
| Related Business Listings |
| Contact Directory |
| Local Business Profiles |