If you’re a proud owner of a Holden Commodore VT, you know that keeping your vehicle in top shape is essential for both performance and reliability. One key component to monitor is the alternator. This vital piece ensures your battery stays charged and powers everything from headlights to infotainment systems. When it starts showing signs of wear or failure, taking on the task of replacing it might feel overwhelming. But fear not! With the proper guidance and tools, you can confidently install Holden Commodore VT Alternator without hassle. Let’s dive into how to tackle this project like a pro while saving yourself time and money along the way!
Gathering the Necessary Tools and Parts
Before installing your alternator in your Holden Commodore VT, it’s crucial to gather the right tools. You’ll need a socket set, wrenches, and a ratchet to tackle those stubborn bolts easily. Don’t forget some pliers for any tight electrical connections.
Next on your list should be replacement parts. A new alternator explicitly designed for the VT model will ensure compatibility and performance. Check that you have all necessary components handy—new belts or washers may also be handy during installation.
Safety gear like gloves and goggles should also be considered. They protect you from sharp edges or accidental shocks while working under the hood. Organizing everything before starting makes the process smoother and less stressful.
Disconnecting the Battery Safely
Before you dive into installing the alternator, it’s crucial to disconnect the battery. Start by locating the negative terminal, usually marked with a minus sign (-). Carefully loosen the nut and remove the cable using a wrench or socket. This step is vital for your safety.
Once you’ve removed the negative cable, ensure it’s tucked away from any metal parts in the engine bay. This prevents accidental contact while you’re working on your Holden Commodore VT. It’s a simple precaution to save you from potential shocks or shorts.
If you’re feeling extra cautious, consider removing the positive terminal. Although not always necessary, it provides an added layer of protection during installation. With everything disconnected and secured, you’ll be ready to tackle your alternator replacement confidently.
Locating the VY V6 Alternator in the Engine Bay
Locating the VY V6 Alternator in your Holden Commodore VT is straightforward once you’ve prepared properly. Open the bonnet and take a moment to familiarize yourself with the engine layout. The alternator is typically situated near the front of the engine, mounted on either side, depending on your specific model.
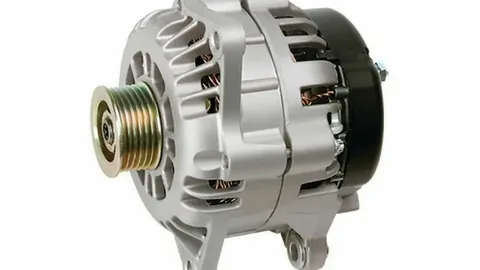
Look for a cylindrical component with electrical connections and drive belts attached to it. Two main wires should lead into it – one positive and one negative. These wires are usually covered in plastic sheathing for protection. If you have difficulty spotting it, refer to your vehicle’s manual or look up diagrams online that specifically highlight its location within the VT series. Ensuring you correctly identify this part will set you up nicely for removal and installation tasks.
Once located, double-check that there’s enough room around it for maneuvering tools during installation later on. This preparation can save you time when you’re ready to get hands-on with replacing or fixing your alternator. Correctly identifying all components makes things smoother as you progress with your project!
The Complete VY Commodore Alternator Replacement Checklist
To ensure a smooth VY Commodore Alternator Replacement, start by gathering all necessary parts. You’ll need a new alternator for the Holden Commodore VT, bolts, and possibly new gaskets or seals. Having everything on hand saves time and frustration.
Next, prepare your workspace. Make sure you have proper lighting and a clean area to work in. This helps prevent the loss of small components during installation, and a comfortable environment makes the process more enjoyable.
Review your tools list before diving in. Essential tools include socket sets, wrenches, pliers, and safety glasses for protection. With this checklist handy, you’ll be well-prepared to tackle the alternator replacement with confidence and ease.
Unbolting the Old VT V6 Alternator
Before unbolting the old VT V6 Alternator, ensure you have your tools ready. A socket wrench set and a few extensions will make this task more manageable. Make sure to work in a well-lit area so that you can see what you’re doing.
Locate the alternator’s mounting bolts. Two or three bolts typically hold it in place. Use your socket wrench to remove these bolts carefully. Be mindful of any washers that may fall off during this process; keep track of them for reinstallation later.
Once all bolts are removed, gently wiggle the alternator loose from its position. It might be slightly stuck due to corrosion or dirt buildup, so don’t force it too hard—gentle nudging should do the trick!
Disconnecting Electrical Connections
Before removing the alternator in your Holden Commodore VT, safely disconnecting electrical connections is crucial to avoid short circuits or damage. Follow these steps to ensure a smooth process.
Locate the Battery Terminal
Start by identifying the negative terminal of the battery. This prevents accidental electrical surges while working on the alternator. Use a wrench to loosen and remove the terminal clamp.
Unplug the Alternator Wiring Harness
Find the wiring harness connected to the alternator. Press the locking tab and gently pull the connector free. Avoid tugging on wires to prevent damage to the terminals or insulation.
Remove the Main Power Cable
The thick power cable is secured with a nut on the alternator’s rear. Use a socket wrench to loosen it, then carefully detach the cable. Inspect for corrosion or fraying before reinstallation.
Detach the Voltage Regulator Connector
Some models have a separate voltage regulator plug. Unclip it carefully to avoid bending pins. Check for dirt or damage that may affect performance.
Secure Loose Wires
After disconnecting all electrical links, tuck wires away from the work area. This prevents interference during alternator removal and keeps components safe from accidental tugging.
Preparing the New Alternator VT Commodore for Installation
Before starting the Alternator VT Commodore installation process, take a moment to inspect your new alternator. Make sure it matches the specifications of your previous unit, and check for any visible damages or defects. A quick visual inspection can save you time and frustration later.
Next, familiarize yourself with the mounting points on the new alternator. This ensures that you know where to position it during installation. Preparation will make securing it much easier once you work in tight spaces.
Keep all necessary components nearby—like bolts and washers—to streamline your workflow. Everything within reach helps prevent unnecessary interruptions while installing the new alternator in your Holden Commodore VT. This organized approach sets you up for a smooth replacement experience.
Installing the New VT Commodore Alternator Securely
Once you have your new alternator ready, it’s time for installation. Begin by positioning it within the engine bay. Ensure that it aligns correctly with any mounting brackets and bolt holes. A careful fit is crucial to avoid unnecessary strain on components.
Next, hand-tighten the bolts first before entirely securing them with a wrench. This method allows for slight adjustments as you work through the process. Ensure each bolt is tightened to its recommended torque specifications to prevent future issues.
Once everything is secured, double-check all connections. Ensure that no wires are pinched or at risk of damage during operation. A neat installation contributes not only to the functionality but also to the longevity of your new VT Commodore Alternator.
Reconnecting the Drive Belt Properly
Reconnecting the drive belt on your Holden Commodore VT is crucial to ensure everything functions smoothly. Start by aligning the belt over all the pulleys, ensuring it sits snugly in their grooves. Please pay close attention to any tensioner or idler pulleys; they need special care when placing the belt.
Once it’s positioned correctly, check for twists or misalignments that could lead to premature wear. The last thing you want is a squeaky belt causing issues down the line. After confirming the correct placement, use a wrench to release any tensioners if necessary and allow them to return to place. Double-check that the belt has proper tension before moving on—this will help avoid slipping while driving and keep your battery charged effectively.
Removing the Drive Belt
Locate the tensioner pulley to remove the drive belt on your Holden Commodore VT. This pulley is crucial for maintaining proper belt tension and must be released before you can remove the belt. Use a ratchet or a suitable wrench to turn the tensioner counterclockwise, relieving pressure on the belt.
Once you’ve loosened it up, carefully slide the belt off the pulleys one at a time. It’s helpful to remember how it routes around each pulley for when you install the new alternator later. Keep an eye on any wear or damage while you’re at it; this could save you from future headaches. After removing it entirely from all pulleys, safely set your old drive belt aside. Make sure not to misplace it, as you’ll need that routing information once it’s time for installation again.
Conclusion
Installing Holden Commodore VT Alternator can save you time and money. With the right tools and a little patience, you’ll find that tackling this task isn’t as daunting as it seems. Familiarizing yourself with the engine layout and following each step methodically ensures a hassle-free experience. It’s all about taking one stage at a time, so don’t rush through it. Once you’ve completed the installation, watch how your vehicle performs. Regular maintenance checks will help you catch any potential issues early on. Enjoy driving your newly revitalized Commodore!
FAQs
You might have some questions about replacing the alternator in your Holden Commodore VT. Here are five frequently asked questions that can help clarify the process and ensure a smooth installation.
What tools do I need for the alternator installation?
You’ll need essential hand tools like a socket set, wrenches, pliers, and screwdrivers. A torque wrench is also advisable to ensure everything is tightened correctly.
How long does replacing VT Commodore Alternator take?
Typically, VT Commodore Alternator will take 2-4 hours if you work at a moderate pace. However, your experience level may affect this timeline.
Can I drive my car with a faulty alternator?
It’s not advisable. A failing alternator can drain your battery quickly and lead to further electrical issues in your vehicle.
Is it necessary to disconnect the battery before starting work?
Yes! Disconnecting the battery ensures safety by preventing accidental short circuits or shocks while working on electrical components.
What should I do if my new alternator doesn’t fit properly?
If you encounter alignment issues during installation, double-check all connections and brackets. If problems persist, consult with the supplier or seek professional assistance.
With these insights in mind, tackling an alternator replacement becomes less daunting. Happy repairing!
| Related Business Listings |
| Contact Directory |
| Local Business Profiles |