A leaking washing machine disrupts laundry routines. Water puddles create mess and risks. Identifying the leak’s source is crucial. For Kelvinator Washing Machine Repair needs, quick fixes save the day. Call (608) 429-0374 for expert help. This post guides you through troubleshooting and resolving leaks.
Addressing Kelvinator Washing Machine Leaks
Leaks in Kelvinator washers stem from various issues. Water escapes from hoses, seals, or pumps. Prompt action prevents damage to floors. For Kelvinator Washing Machine Repair, start with simple checks. Then, move to detailed inspections. Regular maintenance reduces leak risks. Consequently, your machine stays in top shape.
Causes of Washer Leaks
Several factors lead to leaks. For instance, worn door seals allow water to escape. Loose hose connections drip during cycles. Additionally, clogged drains cause overflows. Cracked tubs or pumps leak under pressure. Detergent overuse creates excess suds. Furthermore, aging parts wear out. Routine checks catch these early. Thus, timely fixes prevent bigger issues.
Signs of a Leak Issue
Leaks show clear symptoms. Water pools under the machine. Wet clothes stay soggy post-cycle. Drips appear during rinse or spin. Mold smells signal hidden leaks. Moreover, error codes like OE may display. Spotting these signs early avoids costly damage. Quick action restores normal operation.
Step-by-Step Leak Troubleshooting
Fixing leaks starts with safety. Unplug the machine before inspecting. Gather tools like a screwdriver and towels. Note any error codes. Then, follow a clear process. If problems persist, pros step in. After each fix, run a short cycle to test. This confirms the issue is resolved.
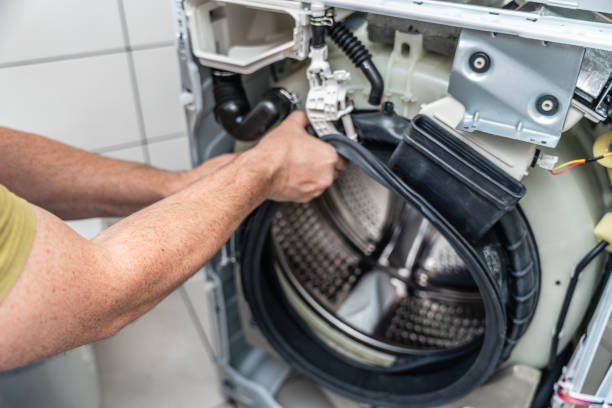
Inspecting the Door Seal
A damaged door seal often causes leaks, especially in front-loaders. Check the rubber gasket for cracks or tears. Clean it with a damp cloth to remove debris. Ensure it sits tightly against the drum. Replace worn seals to stop leaks. For Kelvinator Washing Machine Repair, this is a common fix. Test a rinse cycle after cleaning or replacing.
-
Wipe the seal to remove lint.
-
Check for tears or loose fit.
-
Run a test cycle post-inspection.
If leaks continue, move to other components. Seals are a frequent leak source.
Checking Hose Connections
Loose or damaged hoses lead to drips. Inspect inlet and drain hoses at the back. Look for cracks or loose clamps. Tighten connections with a screwdriver. Run water through detached hoses to check for blockages. Replace worn hoses. This step often stops leaks. In Washing Machine Repair Naperville, techs handle hose issues quickly.
Examining the Drain Pump
A faulty pump can leak. Access it behind the lower panel, per the manual. Check for cracks or loose fittings. Ensure the pump’s seals are intact. If water seeps from the pump, it may need replacement. Clean any debris around it. If the pump is damaged, professional help is best. Test drainage after inspection.
Verifying Pump Integrity
After checking, test the pump. Reassemble all parts. Plug in and run a short cycle. Listen for unusual noises. Leaks during drainage suggest pump failure. Avoid DIY repairs for cracked pumps. Call experts for safe fixes. This ensures long-term reliability.
Addressing Tub and Detergent Issues
Cracked tubs leak under pressure. Inspect the drum for visible damage. Small cracks need professional repair. Overusing detergent causes suds to overflow. Use high-efficiency (HE) detergent in correct amounts. Clean the tub with vinegar monthly. This prevents residue buildup. These steps reduce leak risks significantly.
Preventive Maintenance for Leak-Free Operation
Regular care stops leaks. Clean door seals monthly. Check hoses yearly for wear. Use the right detergent amount. Keep the machine level to avoid strain. Schedule annual servicing. These habits prevent water escape. As a result, your washer runs smoothly.
Daily Habits to Prevent Leaks
Simple routines help. Use HE detergent for Kelvinator models. Avoid overfilling the drum. Wipe seals after each load to prevent mold. Check for small items in pockets. These steps protect seals and hoses. They also reduce the need for Kelvinator Washing Machine Repair.
Long-Term Care for Washer Parts
For optimal results, schedule periodic maintenance from a professional washing machine repair service. Technicians can check hoses, motor function, and drainage components to catch issues early. These preventive efforts reduce pump stress, minimize breakdowns, and extend your washer’s lifespan. With proper upkeep, Kelvinator Washing Machine Repairand maintenance needs remain minimal, ensuring long-lasting efficiency.
Conclusion
Leaks in Kelvinator washing machines are fixable with clear steps. Regular maintenance prevents most issues. Quick troubleshooting resolves common faults. For persistent leaks, professionals ensure safe repairs. Use these tips to keep your washer leak-free and efficient.
FAQs
Why does my Kelvinator washer leak from the bottom?
Leaks from the bottom often come from loose hoses or a cracked pump. Check hose connections and tighten them. Inspect the pump for damage. Run a test cycle. If leaks persist, a technician can diagnose deeper issues.
How often should I clean the door seal?
Clean the door seal monthly. Wipe it with a damp cloth to remove lint. Check for cracks or wear. This prevents leaks and mold. Regular cleaning keeps the seal effective.
Can too much detergent cause leaks?
Yes, excess detergent creates suds that overflow. Use HE detergent in the right amount. Follow the manual’s guidelines. Clean the drum with vinegar to remove residue. This stops suds-related leaks.
What if my washer leaks only during spin?
Spin-cycle leaks often point to a worn tub seal or cracked drum. Inspect the tub for damage. Check seals for wear. If issues remain, call a pro. They can repair or replace faulty parts.