Building a retaining wall can change your yard completely. It not only helps stop soil from washing away but also makes your outdoor space look neat and strong. In this simple step-by-step guide, you’ll learn exactly how to install a retaining wall—from planning to the final stone. Whether you want to do it yourself or just understand how it works, this guide will make everything clear and fun to read.
Plan Your Retaining Wall
Every great project starts with a plan. Take a look at your yard and decide where you want the wall to be. Think about what purpose it will serve. Do you need it to hold back soil, make a flat garden area, or just add beauty?
Use a tape measure to find the length and height of the area. Remember—higher walls need stronger support,to retaining wall installation and sometimes a permit may be needed depending on where you live.
A good plan saves you from costly mistakes later. Imagine how nice your wall will look before you even start digging. This vision will keep you motivated all the way through!
Choose the Right Materials
Now that you have your plan, it’s time to pick your materials. You can choose from different types of blocks, stones, or bricks. Each has a unique look and weight. Concrete blocks are easy to stack and often have a lip that locks them in place. Natural stones give a rustic feel but can be tricky to align.
Think about your home’s design and choose what matches best. For small garden walls, lightweight blocks work great. For large retaining walls, stronger materials like interlocking concrete are better.
Don’t forget about drainage stones and landscape fabric—these small details make your wall last much longer.
Gather Tools and Supplies
Before you start building, collect everything you’ll need. Here’s a simple list to keep you on track:
- Shovel and wheelbarrow
- Measuring tape and level
- Landscape fabric
- Gravel and sand
- Concrete or stone blocks
- String line and stakes
- Gloves and safety glasses
Having all your tools ready before you start saves time and energy. It also makes the building process smoother and more enjoyable.
Prepare the Base
The base is the most important part of your wall. If it’s not level, the wall won’t stand strong. Start by digging a trench where your wall will sit. The trench should be deep enough to hold a layer of gravel and the first row of blocks—usually about 6 inches deeper than the height of one block.
Next, fill the trench with crushed gravel and use a hand tamper to pack it tightly. The gravel base keeps water from collecting and helps your wall stay level. A solid base means a solid wall, so take your time on this step!
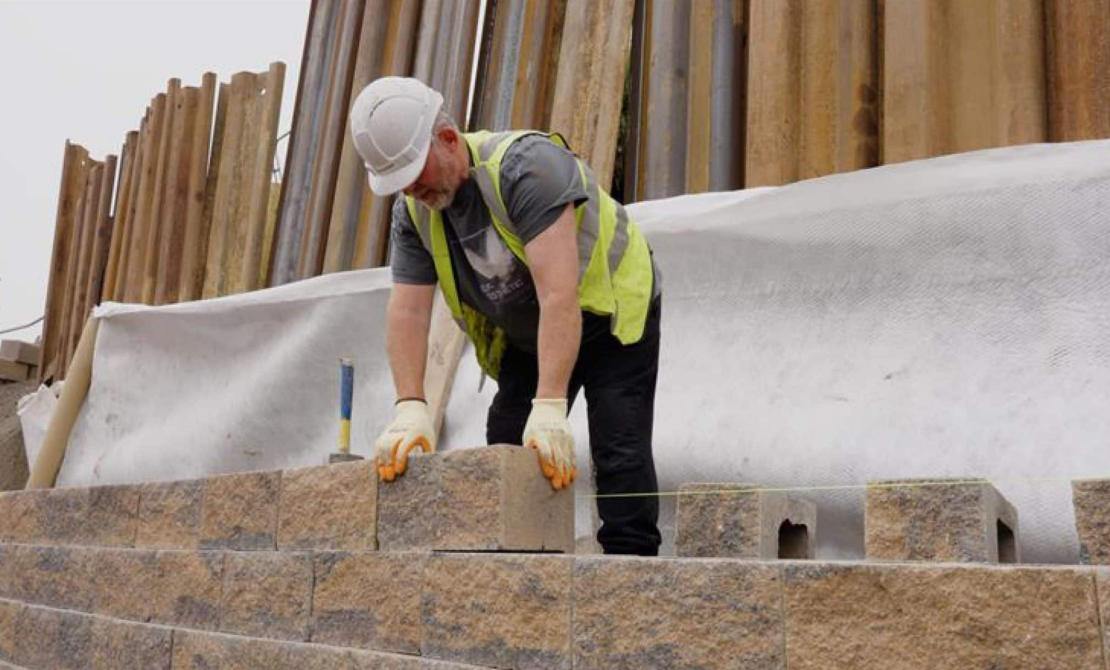
Set the First Row
Lay the first row of blocks on the leveled gravel base. Use a level to check each block—this step is crucial because it sets the tone for the entire wall. If one block is off, the rest will follow.
Make small adjustments by adding or removing gravel under each block until they line up perfectly. Tap them gently with a rubber mallet to set them in place. This base row acts like the foundation of a house. Once it’s level and secure, the rest of your wall will be easy to build.
Build Up the Wall
Now the fun part begins! Start stacking your next rows of blocks. Stagger the seams (like brickwork) so that no joints line up directly. This makes the wall stronger and more stable.
As you build, place gravel or small stones behind each layer. This helps with drainage and keeps pressure off the wall. Use your level often to make sure the wall stays straight both horizontally and vertically.
Keep going until your wall reaches the desired height. Remember to step back and admire your progress—it’s satisfying to see your hard work taking shape!
Add Drainage for Strength
Proper drainage is key to a long-lasting retaining wall. Without it, water can build up behind the wall and cause it to lean or crack.
Place a perforated drainage pipe behind the base of the wall and cover it with gravel. Then, add landscape fabric over the gravel to prevent soil from clogging the drain. This small step protects your wall from water damage for years to come.
Good drainage means your wall will stay sturdy even during heavy rain.
Cap the Wall
Capping gives your retaining wall a finished and professional look. Use flat stones or special cap blocks designed for the wall system you chose. Apply a layer of construction adhesive between the top blocks and the caps to keep them in place.
This final touch not only looks good but also helps protect the wall from erosion and wear. Once you add the caps, step back and enjoy the beauty of your work. You’ve created something that’s both strong and stylish!
Clean and Finish the Area
After your wall is complete, take some time to clean up. Remove any leftover gravel or debris. Fill the area behind the wall with soil and add plants or grass for a natural finish.
You can also add lighting, garden decor, or a pathway nearby to make your new retaining wall part of your landscape design. The goal is to make your yard both useful and beautiful—a place you’re proud to show off.
Maintenance Tips
Retaining walls are low maintenance, but a little care goes a long way. Check your wall every few months for signs of shifting or cracks. Make sure the drainage system stays clear.
Remove weeds that might grow between the blocks. If you notice any loose stones, fix them early before the problem gets bigger. Simple steps like these help your wall stay strong for many years.
A well-built wall can last for decades with just a bit of care and attention.
Understanding Retaining Wall Installation
If you’re planning a project like this but feel unsure about doing it alone, professional help can make a big difference. Experts in retaining wall installation know exactly how to design, level, and secure each part of the structure to handle soil and weather conditions.
Hiring a skilled team ensures your wall not only looks great but also stands strong for many seasons. It’s a smart way to save time and avoid costly errors while getting a durable and beautiful result.
When to Call the Pros
If your wall is taller than 4 feet or supports heavy loads, it’s wise to get expert help. Professional installers have the right tools and knowledge to handle complex projects safely.
They’ll also help with permits, drainage planning, and soil testing. Even if you start the project yourself, you can always get advice from a professional before moving forward.
For reliable, affordable, and high-quality retaining wall services, you can visit DFW Retaining Walls & Pool Demo They specialize in creating durable, long-lasting retaining walls that add both beauty and function to your property.
Conclusion
Installing a retaining wall is not as hard as it sounds when you follow the right steps. From planning and preparing the base to building and capping, each step builds strength and stability. With patience, care, and the right materials, you can create a wall that looks great and lasts for many years.
Whether you do it yourself or hire a professional, a retaining wall is one of the best ways to enhance your outdoor space. So grab your tools, follow these steps, and start building your dream yard today!
FAQs
How long does it take to install a retaining wall?
For small walls, it usually takes one to two days. Larger walls or complex designs can take several days or even a week. The time depends on the materials, size, and weather conditions.
Do I need a permit to build a retaining wall?
In many areas, small walls under 4 feet don’t need a permit. But if your wall is taller or supports heavy loads, you might need one. Always check local building codes before starting.
How long will a retaining wall last?
With proper construction and drainage, a well-built retaining wall can last 20 to 50 years or more. The key is using quality materials, keeping it level, and maintaining it regularly.